Friday, May 22, 2015

No Sew Doll Dress

Happy Friday!!!  I hope you all get to enjoy the long weekend. But before you go off to start your exciting plans heres an easy DIY Doll Dress Tutorial modeled by my Journey Doll Chavonne. 
These dresses were made using two sleeves from a long sleeved thermal type shirt from Old Navy (Medium Size). I loved the pattern but hated the fabric which felt itchy on my sensitive skin. As you can or can not see, the shirt was snagged in the middle probably from washing or regular wear. I figured it would be of better use if worn by Chavonne instead of being discarded. 
All you will need for this project is a long sleeved shirt made from a stretchy fabric, and a pair of scissors. For the second dress I used some already embellished tulle type material on elastic that I purchased from the fabric store months ago with no project in mind, however you can use ribbon, a piece of edging from the shirt, or any material that you may have to make a belt.
1. Begin by cutting off one sleeve as shown below. The cuff on my shirt was pretty long so I folded it over after sliding the dress on my doll. I then cut off the bottom the dress right above Chavonne's knees.
2. Cut off the end of the cuff on the other shirt sleeve. On my shirt there was no stitching on the end so when I opened up the fabric it was pretty wide. I just tucked the raw edges inside. 
And you are all done! Yes that easy. 
For Dress two. You will be using the top side of the sleeve that was cut off of Dress 1. When you open up the dress and put the seem in the middle and flip the fabric upside down you will have a dress like in the 3rd pic with a cute fish tail. Simply add a belt and you are all done.
I hope you try this super easy, cost efficent project this weekend. As I go through my winter clothing that will not be worn next year I will be coming up with little porojects to share with you all.

Thanks for stopping by and have a great weekend.

If you do happen to make your own dress be sure to post it or tag me on your Instagram!

~Darley


Tuesday, May 19, 2015

Mothers DayCards

Hello there. Hope all the moms enjoyed Mother's Day and are still getting the awesome treatment from their children and loved ones. For Mother's Day I held a kids class where we created cards and decorated tiny pots which held Cilantro seeds that my little helper planted me. I originally asked the moms to provide me with pictures of the kids but later thought the cards would be even more personal if they included pictures of the mom and their child. Since most of us do not have great pics on hand and definitely don't have them printed, I took pics of the moms and their daughters when they dropped them off for the class and printed them out on my home printer directly from my phone (thank you blue tooth/wifi). The kids cards were so beautiful and filled with love! I also created a couple cards using some of the materials from my kids class. Someone keep me from spending even more money at Michael's LOL. Here are some cards that I made and managed to sell (Yeah Me!) and a picture of the super cute plant holder. 


 Both of these cards are designed to have a pic added to the top.


I've already decided that our Fathers Day card will be more like a booklet... Hope the moms aren't too offended but we always have to one up ourselves on every craft right? I know you share the same sentiment. LOLThanks again for stopping by.Darley~

Sunday, May 10, 2015

Ladies Night class- Wall Art

Hi there.
So happy to announce that my second ladies night class was a success! I had a completely different group of ladies from the first class but they were just as hilarious. Trust me there's nothing like crafting and laughing and having wine. The idea for this class started with Margo wanting to do wall art on canvas. She wanted to stencil the words live, laugh, love. You should already have that phrase drilled into your head by now. Michael's had canvases on sale so I said lets do it. I've done stenciling before and tried steciling with acrylic paint for my first demo and decided that it would be too messy and time consuming. I may have also had a mishap where I didn't pay attention to my spacing and didn't have enough room for the last letter of the word that I was creating but I'm not going to admit to that lol. Since the steciling was out I had to come up with plan B which is where I came up with the felt flower. I couldn't actually find a tutorial with a template so I had to come up with my own plan, and all of the ones I saw used hot glue guns on the petals which wouldn't work if I had 9 women trying to do it all at once and the risk of burning fingers....so I came up with a mostly basic sewing and minimal glue gun method.

The ladies definitely had a lot of fun and so did I!

Can't wait to see you at my next Ladies Night Class.

Darley~

Sunday, April 19, 2015

Getting Organized For Spring


Happy Monday.
I hope that you all had a great weekend! I definitely enjoyed mine. The cold crappy New England weather has finally disappeared and SPRING IS HERE! As you can tell I'm very excited. Overall I enjoy organizing and am always looking for ways to get more organized but now that the weather will be beautiful and I will be spending more time outdoors (my toddler insists on living outside), it is even more essential that I am very organized and focused during the week so that my weekends are free. During Easter weekend I began my office re-organization by moving the furniture around and making some decorative changes which I will share on another post when everything is finished. The main reason for the change was not only so that I can stare at the window while I "worked" but because I didn't feel like the previous layout was functional and allowed me to be my best.


One issue I was having was the pileup of magazines as they came in, so I came up with the solution below. Well I saw something similar on Pinterest or somewhere and decided it would work great for me, and it has been! Now when the new magazines come in, I just put them in the magazine holder and am able to easily access them when I finally get a moment to read one. By the way there are more magazines in there since I took this picture. Sigh....
I also decided to get rid of my big bulky calendar and wanted to have one on a clipboard. I founds these cute Free Printables on ThirtyHandmadeDays I also found a cute Blog template on the same site which I am planning on trying. I've printed out a couple others, but you know how it is. Even though something is a great idea, it doesn't mean it will work for you. But I will give it a try. The website also has may other templates that are useful for everyday life budgeting, organizing, and such so I do encourage you to check it out.
Staples Clipboards transformed by just adding a cute burlap sticker.


Hope you have a great day and thanks for stopping by!


Darley

Tuesday, March 17, 2015

Fabulous Paper Doll Class

Card stock and felt is a guaranteed good time! Isn't it??? LOL
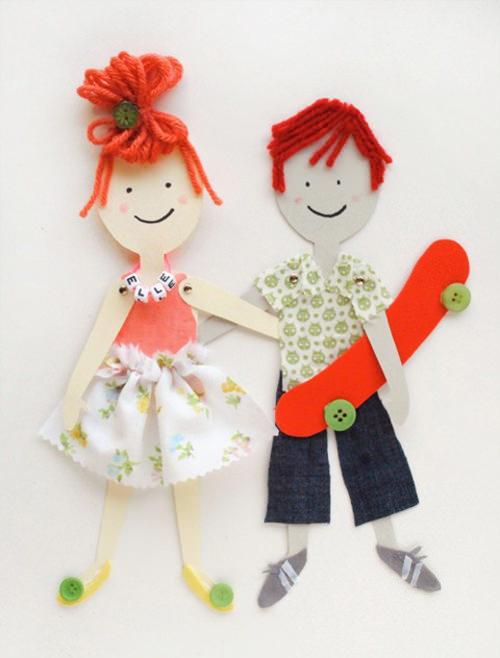
While enjoying my usual Pinterest surfing I came across the cutest Paper Doll from Handmadecharlotte so I read her instructions, and reached out to a friend to get the Brads, purchased some yarn and tried it out. I'd like to first add the disclaimer that 95% of the time when I see a new craft I only have to attempt it once and am able to execute... the hair on the girl paper doll.... not so much with this craft. The brads worked as shown below but it was a bit more complex than what I wanted for my class...
diy paper dolls
HandmadeCharlotte


So I went back to the drawing board to figure out how to accomplish a similar look, that my students age 7 and up can accomplish on their own. First I printed out the template on different color card stock and cut them out myself since little fingers are not as good at cutting out smaller pieces and it would give my students more time to be creative. I also created hair templates for them that were to scale so that they could easily use them on the dolls and spend the time designing the clothing. The body parts were glued together by my students and they were provided with an outline of their doll which they used to sketch the clothing before they began cutting and gluing. The end results were more adorable than I expected!!!!!
Here's my paper doll.


If you would like to work on this with your little one be prepared to do the prep work before you sit down with him or her. You should print out the template from HandmadeCharlotte and cut out the body parts. Align the legs and hands where you think they will be permanently placed and trace the doll on plain white paper with a pencil. Make a couple copies because you will need to use one to sketch out the hair and then another to sketch out the outfit with your child. Since the sketch is to scale you can cut out the clothing and hair sketches and use them as your template to cut out the clothing. If you are planning this craft with a small child, I highly advise that you have templates prepared ahead of time so that they will not lose interest. I used felt instead of fabric since its so affordable (between 0.30 to .99 cents a sheet) and easy for children and adults to work with. If you have scrap fabric from old clothes hanging around, they can be used as well. Glitter glue can be used to embellish clothing, along with buttons. Standard Elmers school glue is perfect for this craft so no need to go out and get some expensive glue.

All in all I am so glad that I found this craft as well as how happy the little dolls made my students. Most of the students opted for me to glue the dolls onto card stock since they will not be playing with her and can easily tape her to their wall.

I hope you try this craft with your little one, someone elses little one...or just by yourself one evening. LOL

Thanks again for stopping by.

~Darley


Sunday, March 15, 2015

Cake Talk - Ladies Cake Pop Fun-Venture

 I've been asked so many times, when am I going to have an adults class and I finally did it and it was so much fun!!!! My goal was 8 ladies, 1 couldn't make it but I still ended up with 9. The class took place on a Friday evening, with food and craft supplies provided for a small fee. Ladies brought their own wine and a very good attitude (which was probably because of the wine) lol, but either way the class was just what I wanted. Very relaxing pace, no pressure crafting, good food, and lots of laughs. My partner in crime Margo, who has her own event planning business in Trinidad and Tobago made the most delicious baked chicken breast which was so moist, along with wheat pasta mixed with pesto and some other ingredients. I "cooked" garlic bread and the most amazing asian sesame salad (prepackaged for my enjoyment by Dole). 

Of course there was some prep work before the class. My two main crafts were the wine glass charms that you see below along with the cute baby food jars, turned cake pop holders. Here's how we created them.
Wine Glass Charms- Pre-shaped cork, ribbon, letter stickers, and a hole punch. Punch a hole towards the top of the cork shape, place the sticker for the first initial of the persons name, and tie a piece of ribbon to the glass in a cute bow. Just that simple. When the class was over the ladies wanted to take their wine glass charms home with them and tied them around their cake pop holder. Very clever of them. 
Cake Pop Holder- When my son was eating baby food I decided to start saving the jars for upcoming craft projects although I had no idea what projects they would be. They were already washed and the labels removed however there was still some residual glue. I used Goo Gone which does a great job of removing all of the extra glue. I would recommend using dawn to soak and wash the jars after you have used the strong chemical since the jars will be near food. After having my kids craft class earlier this month, and creating something similar, I decided to create a holder that was a bit more "finished" for the ladies. To complete this you will need baby food jars, foam, burlap ribbon, tissue paper, and a glue gun. I was able to get the ribbon, foam(comes in a pack of 4), and the tissue paper from the Dollar Tree for $1. Such a great find. So I began by 1. Cutting the ribbon a little longer than the width of the jar. This is so that when I get to the ending I will have enough ribbon left to fold it over and have a neater edge. 2. I then glued down a straight line around the edge and a little glue around the sides. Once I brought the ribbon all the way around, I folded the edge and glued this down as well. 3. The foam comes in a set of 4 or 5 and is way larger than you need for this project. You only need a fairly small piece that can be inserted into the jar. One foam piece  should be cut roughly into 4's and then each piece in half again. 4. Stack up 4 pieces of tissue paper in whatever color variations that you would like and cut the sheet into even 4's. Align the tissue pieces so that no corners are on top of each other. You can then place the piece of foam into the middle of the tissue and crunch it around. The entire thing should then be placed into the center of the jar. 

I am the hand model on top and Margo is on the bottom. 
Mini Cupcake Tins work great for cooling the cake pops. 
Ladies Having Fun
Cake pops ready to be bagged and sent home.
For this class we used the Bella Cake Pop Maker, Wilton Candy Melts, melted chocolate chips and sprinkles. Cake pop batter was mixed right in class while the ladies sipped their wine and they only had to bake for 3 minutes per batch so we were able to complete the 4 batches in no time. While the pops were cooling we enjoyed our meal with more wine and then went to work on beautifying these babies.
Overall probably the most fun I've had teaching a class!!!! Even the ladies who weren't sure about coming because they do not consider themselves to be crafty had an amazing time.

Thanks again Ladies for coming and I hope to see you at my next class. If you are interested in booking a private event for adults or kids send me a message through the Class Registration Link. 

See April Kids Class

~Darley


Wednesday, February 11, 2015

Valentine's Day for Boys

Hi there. I'm always being asked why I don't do craft classes for boys and I usually respond by saying that I have a toddler/boy and a teenage stepson and from experience I know that they are not as able to maintain the level of focus that girls do when it comes to crafting. My other reason is that girls crafts are soooo cute and abundant. ❤️❤️❤️❤️ Well this Valentine's week I was given the challenge of creating a card box for a kindergarten boy to bring to school. He also had to bring invitations for the 18 students in his class. At first I was thinking "Why is this a big deal? Can't we just throw something together?" But then I had a chat with a super crafty friend of mine who was making a Thomas the Train inspired card box for her son. It was beautiful!!! Multiple boxes put together to look like a train. The boxes were wrapped in blue wrapping paper to have the right look, printouts of the eyes... You get the idea. So I thought about what my client would like and remembered that he likes cars. I enlisted the help of one of my favorite assistants (my husband) who cut and shaped a cardboard box into a car shape with a sunroof opening for the cards to be inserted. The clients mom and I then hot glued different pieces of both card stock and heavy duty scrapbook paper and some stickers, and this is what we came up with.
We then used my favorite Martha Stewart Amazon cutter for the entire project and even used it to cut our post card shaped pieces which we used as the Valentine's Cards. My little client was so excited that he couldn't wait to write on his Valentine's cards and bring his card box to school.

Now that I've completed this project and really enjoyed it, I'm becoming more open to introducing a boys craft class...or I can just craft for boys. Lol


Let me know what you think.

Darley~


Tuesday, January 20, 2015

Barbie Blankets sew adorable...........

Hi there. I've been super busy coming up with my upcoming class. Barbie Bedding. Honestly I was having so much fun combining colors and patterns. This would also be a great class for mothers and daughters to do together. I can't wait to see the pattern combinations that my students come up with. So here are a few of the sets that I have created.


I hope this inspires you to pull out your machine and make something lovely or if you love what I've made but would just rather look and enjoy and maybe purchase one, visit my Etsy store. https://www.etsy.com/shop/HartfordCraft

Thanks for stopping by.

Darley~

Wednesday, January 7, 2015

Welcome to 2015

Hello friends. Happy New Year!!! I am so excited to start this new year with you. I started my year by having some friends over for Brunch (a new Annual Tradition)and have been extremely motivated ever since.

Here's a pic of some of the fun.

Let's see what I've been up to since the Brunch
1. Created a new format for the blog
2. Began writing a childrens book
3. Started prepping doll bedding for my Etsy store (Barbie and the larger 18 inch Dolls)
And most importantly
4. Began the painful process of getting my son to sleep in his own bed so that I can have more time to do all of these things. We are on day 5 with about 4 hour's worth of sleep each night but we are optimistic.

#Mission Organization~ To Do List
The #1 thing I am focusing on in order to really make this year a success is to get my To Do Lists in order. I always feel like I have a million lists all over the place and when I get spare moment to work on something I feel totally lost and don't know where to start. I actually just printed out a couple lists from some sites and will see if any of them can help me feel more together. When it comes to documents and stuff overall, I consider myself to be an organization junkie! I purchase all of the magazines, love to organize and love to help people organize.

I would love to hear about what you are planning on tackling in 2015. If you need help, let me know. Once I get myself more organized I'll be able to help you a little more. LOL

~Darley

Thursday, December 4, 2014

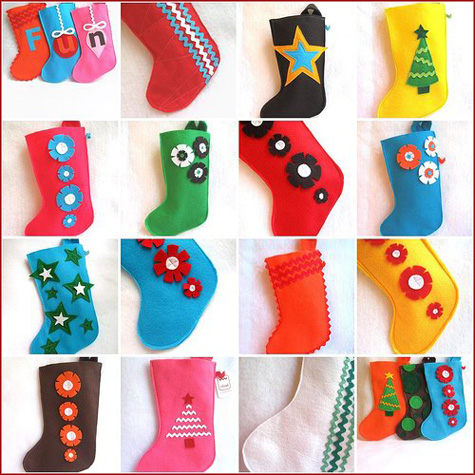
December 2014 Sew Awesome Felt Stocking

Felt Christmas Stocking


Ages 7 & Older


Fun class for those who are new to sewing as well as experienced hand sewers. In this class we will use felt to make a mini stocking as well as using beads to add embellishments.
Also a great way for moms to get some extra time to complete their Holiday Shopping.
 

Dates & Times

Saturday, December 13th 4:00 pm-6:30 pm
Saturday, December 20th 12:30 pm-3:00 pm

Cost: $15.00 Location: East Hartford, CT
**All materials included. Payment due at time of class.


Click here to Register .


Darley~