Tuesday, March 17, 2015

Fabulous Paper Doll Class

Card stock and felt is a guaranteed good time! Isn't it??? LOL
While enjoying my usual Pinterest surfing I came across the cutest Paper Doll from Handmadecharlotte so I read her instructions, and reached out to a friend to get the Brads, purchased some yarn and tried it out. I'd like to first add the disclaimer that 95% of the time when I see a new craft I only have to attempt it once and am able to execute... the hair on the girl paper doll.... not so much with this craft. The brads worked as shown below but it was a bit more complex than what I wanted for my class...
diy paper dolls
HandmadeCharlotte


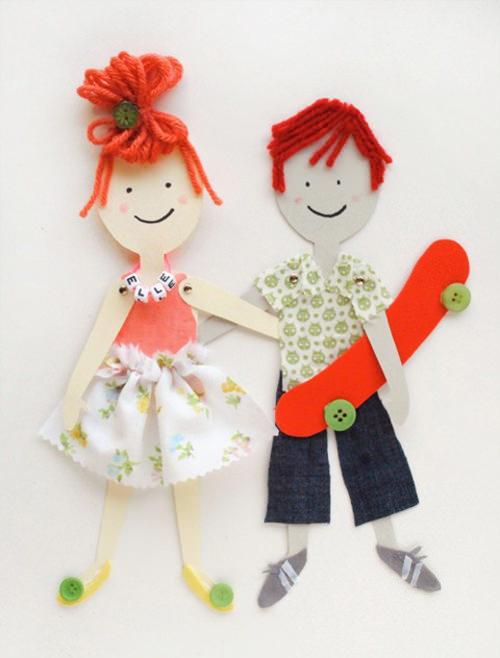
So I went back to the drawing board to figure out how to accomplish a similar look, that my students age 7 and up can accomplish on their own. First I printed out the template on different color card stock and cut them out myself since little fingers are not as good at cutting out smaller pieces and it would give my students more time to be creative. I also created hair templates for them that were to scale so that they could easily use them on the dolls and spend the time designing the clothing. The body parts were glued together by my students and they were provided with an outline of their doll which they used to sketch the clothing before they began cutting and gluing. The end results were more adorable than I expected!!!!!
Here's my paper doll.


If you would like to work on this with your little one be prepared to do the prep work before you sit down with him or her. You should print out the template from HandmadeCharlotte and cut out the body parts. Align the legs and hands where you think they will be permanently placed and trace the doll on plain white paper with a pencil. Make a couple copies because you will need to use one to sketch out the hair and then another to sketch out the outfit with your child. Since the sketch is to scale you can cut out the clothing and hair sketches and use them as your template to cut out the clothing. If you are planning this craft with a small child, I highly advise that you have templates prepared ahead of time so that they will not lose interest. I used felt instead of fabric since its so affordable (between 0.30 to .99 cents a sheet) and easy for children and adults to work with. If you have scrap fabric from old clothes hanging around, they can be used as well. Glitter glue can be used to embellish clothing, along with buttons. Standard Elmers school glue is perfect for this craft so no need to go out and get some expensive glue.

All in all I am so glad that I found this craft as well as how happy the little dolls made my students. Most of the students opted for me to glue the dolls onto card stock since they will not be playing with her and can easily tape her to their wall.

I hope you try this craft with your little one, someone elses little one...or just by yourself one evening. LOL

Thanks again for stopping by.

~Darley


Sunday, March 15, 2015

Cake Talk - Ladies Cake Pop Fun-Venture

 I've been asked so many times, when am I going to have an adults class and I finally did it and it was so much fun!!!! My goal was 8 ladies, 1 couldn't make it but I still ended up with 9. The class took place on a Friday evening, with food and craft supplies provided for a small fee. Ladies brought their own wine and a very good attitude (which was probably because of the wine) lol, but either way the class was just what I wanted. Very relaxing pace, no pressure crafting, good food, and lots of laughs. My partner in crime Margo, who has her own event planning business in Trinidad and Tobago made the most delicious baked chicken breast which was so moist, along with wheat pasta mixed with pesto and some other ingredients. I "cooked" garlic bread and the most amazing asian sesame salad (prepackaged for my enjoyment by Dole). 

Of course there was some prep work before the class. My two main crafts were the wine glass charms that you see below along with the cute baby food jars, turned cake pop holders. Here's how we created them.
Wine Glass Charms- Pre-shaped cork, ribbon, letter stickers, and a hole punch. Punch a hole towards the top of the cork shape, place the sticker for the first initial of the persons name, and tie a piece of ribbon to the glass in a cute bow. Just that simple. When the class was over the ladies wanted to take their wine glass charms home with them and tied them around their cake pop holder. Very clever of them. 
Cake Pop Holder- When my son was eating baby food I decided to start saving the jars for upcoming craft projects although I had no idea what projects they would be. They were already washed and the labels removed however there was still some residual glue. I used Goo Gone which does a great job of removing all of the extra glue. I would recommend using dawn to soak and wash the jars after you have used the strong chemical since the jars will be near food. After having my kids craft class earlier this month, and creating something similar, I decided to create a holder that was a bit more "finished" for the ladies. To complete this you will need baby food jars, foam, burlap ribbon, tissue paper, and a glue gun. I was able to get the ribbon, foam(comes in a pack of 4), and the tissue paper from the Dollar Tree for $1. Such a great find. So I began by 1. Cutting the ribbon a little longer than the width of the jar. This is so that when I get to the ending I will have enough ribbon left to fold it over and have a neater edge. 2. I then glued down a straight line around the edge and a little glue around the sides. Once I brought the ribbon all the way around, I folded the edge and glued this down as well. 3. The foam comes in a set of 4 or 5 and is way larger than you need for this project. You only need a fairly small piece that can be inserted into the jar. One foam piece  should be cut roughly into 4's and then each piece in half again. 4. Stack up 4 pieces of tissue paper in whatever color variations that you would like and cut the sheet into even 4's. Align the tissue pieces so that no corners are on top of each other. You can then place the piece of foam into the middle of the tissue and crunch it around. The entire thing should then be placed into the center of the jar. 

I am the hand model on top and Margo is on the bottom. 
Mini Cupcake Tins work great for cooling the cake pops. 
Ladies Having Fun
Cake pops ready to be bagged and sent home.
For this class we used the Bella Cake Pop Maker, Wilton Candy Melts, melted chocolate chips and sprinkles. Cake pop batter was mixed right in class while the ladies sipped their wine and they only had to bake for 3 minutes per batch so we were able to complete the 4 batches in no time. While the pops were cooling we enjoyed our meal with more wine and then went to work on beautifying these babies.
Overall probably the most fun I've had teaching a class!!!! Even the ladies who weren't sure about coming because they do not consider themselves to be crafty had an amazing time.

Thanks again Ladies for coming and I hope to see you at my next class. If you are interested in booking a private event for adults or kids send me a message through the Class Registration Link. 

See April Kids Class

~Darley